If you are new to sewing, threading your sewing machine can seem like a daunting task. While it may appear like complicated and intricate work, threading a sewing machine can actually be fairly straightforward, especially when you break the process down into simple steps.
This is where we can help! To take some of the confusion and frustration out of the process, we have provided this simple step-by-step guide to threading a sewing machine. Once you have moved through each step several times, threading your sewing machine will seem like second nature!
Threading a Sewing Machine

Before You Get Started
Before we get into our step-by-step guide, it is important to go over a few quick tips you should always follow before you begin:
- It is always important to read through the instruction manual for your sewing machine, as each make and model will be slightly different. This is of greater importance if you have never used your sewing machine before. Nobody will understand how to use your particular sewing machine as well as the people that designed it, so studying the diagrams and instructions will help you get the most out of your machine. If you lost your instruction manual or never received one, check the manufacturer’s website, as many companies will upload downloadable digital versions for each of the sewing machine models they sell.
- Select the thread you would like to use for the particular sewing project you are about to tackle. Not only is it important to choose an appropriate color, you will want to select a high-quality thread that will not fray or tear as your machine is creating stitches.
- Inspect your sewing machine to make sure that it is clean, oiled, and ready for use. It does not matter how well you thread your sewing machine if it has not been cared for properly. Again, reading the instruction manual should tell you everything you need to know in regards to maintenance and upkeep for your machine.
Step-by-step Guide to Threading Your Sewing Machine
Now you are ready to begin! As mentioned, each machine will be slightly different when it comes to the threading process, so you should always read through your instruction manual. With that being said, here are the general steps you can follow to thread just about any sewing machine:
Step 1 – Place Your Thread on the Spool Pin
To start, attach your chosen spool of thread to the top of the machine. Depending on the type of sewing machine you are using, the spool pin could be an upright pin, or one that is facing sideways.
You will want to place your spool of thread in a way that it will be released counterclockwise when your machine is running. While checking the instruction manual is important, most sewing machines will feature a spool placement diagram directly on their surface. This small diagram should make it clear how the spool should be attached.
Step 2 – Pull the Thread and Place it Through the Top-Mounted Thread Guide
Once the thread spool has been placed on the spool pin, you will want to lightly tug at the end of the thread. This will allow you to wind it around the thread guide/tension disc located at the front of the sewing machine.
In most cases, the thread guide will be a small, button-like knob. It helps to ensure that the sewing machine thread is pulled away from the spool in an even and controlled way while your sewing machine is creating stitches.
Step 3 – Pull the Thread Down and Around the Tension Knob
Follow the directional arrows on your sewing machine and pull this way until you can loop it around the tension discs at the bottom. From there, pull the thread upward and through the second thread guide.
Once you have done this, the thread should create a long and narrow “U” shape. At this point, the end of the thread should be hanging out of the side of your sewing machine.
Step 4 – Wrap the Thread Down Towards the Needle
Pull the thread down toward the needle and make sure you follow any hooks or channels that are designed to hold the thread in place. Again, each machine will be slightly different, so make sure you run the thread through anything that is meant to hold it.
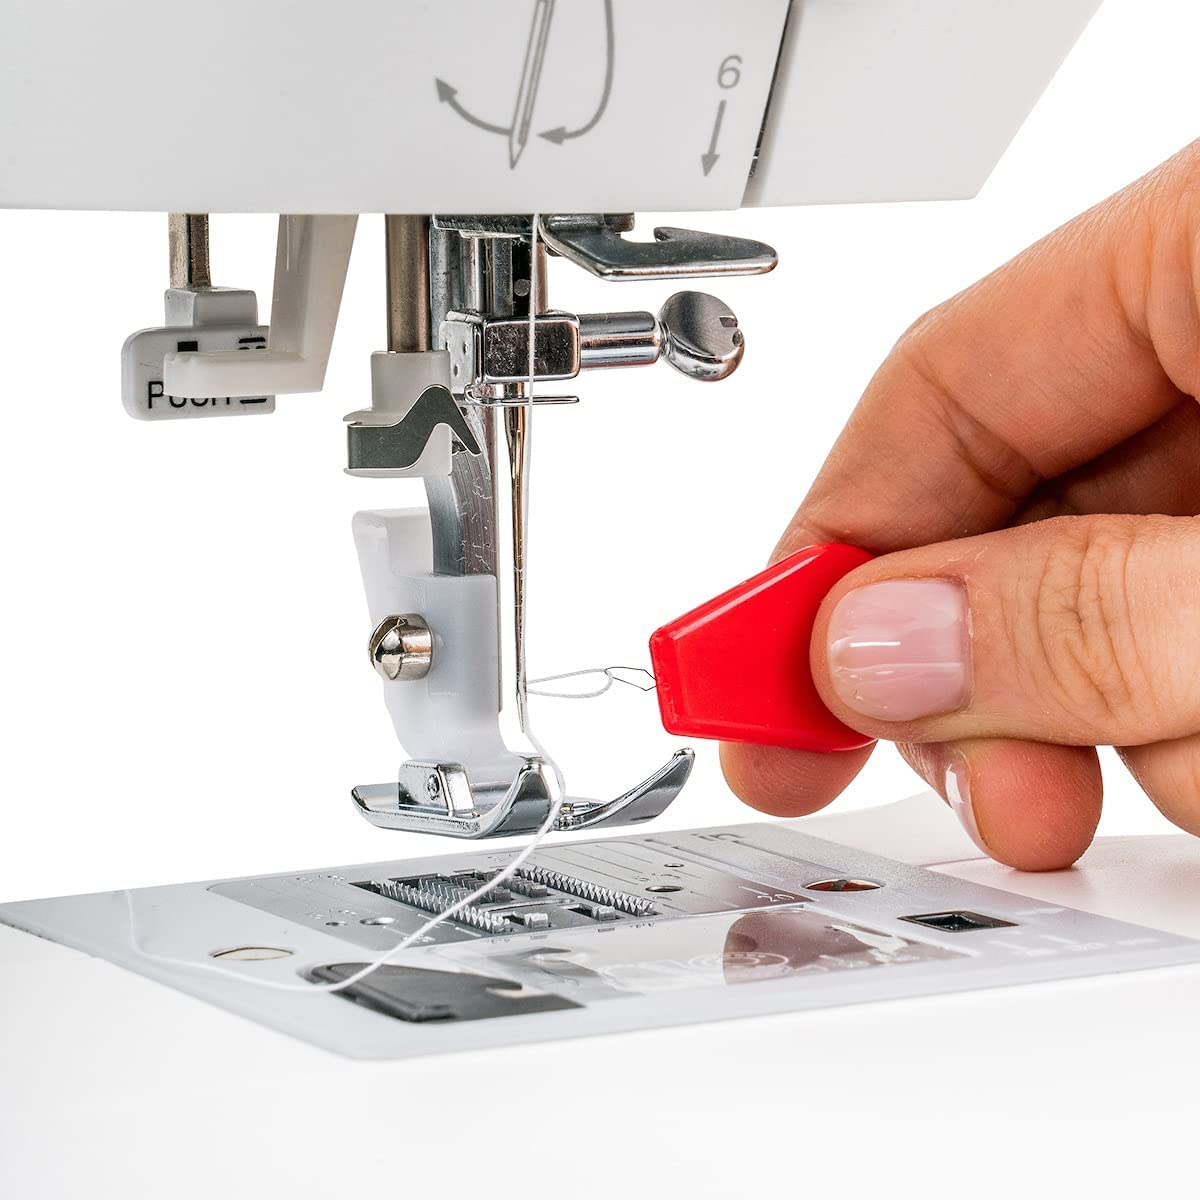
Step 5 – Thread the Needle
After you have pulled the thread toward the needle, you need to actually thread it. This involves inserting the end of the thread through the small eye of the needle. You will need to pull several inches worth of thread through. From there, you will pull the thread through the metal presser foot located directly beneath the needle.
Guiding the thread through the tiny eye of your sewing machine’s needle can be fairly difficult. If you are struggling, consider using a pair of tweezers, as this will allow you to get a firmer grip on the thread. The narrow, extended arms of the tweezers will also you to have more control over the thread.
Step 6 – Insert Your Wound Bobbin
Now that you have threaded the needle, you need to insert the bobbin. Check your instruction manual to find the correct bobbin type for your machine. Once you have that, you can insert your wound bobbin.
Depending on the type of machine you are using, the bobbin will either be inserted from the top of the machine or from the front. Some also have the bobbin drop directly into the machine, while others simply hold it in a fixed position. Again, this is why it is important to watch an instructional video or consult an instructional diagram for your specific machine.
Once the bobbin has been inserted, turn the flywheel, which is the large dial located on the right-hand side of your sewing machine. Turning the flywheel toward you will draw the top thread in the direction of the bottom thread.
You will want the bobbin thread to sit near where the needle is attached to the sewing machine.
Step 7 – Join the Bobbin Thread and Top Thread
At this stage, you need to join the two threads. Find the loop of the bobbin thread that is being held and pull it upward. This involves some fairly intricate work, so you may need tweezers or a classic needle threader.
If you do not own a needle threader, this simple pack of three SINGER Metal Needle Threaders is a great choice. They are budget-friendly and incredibly handy.
Step 8 – Pull the Two Threads Ends Out of the Way
Now that the bobbin and spool threads have been joined, you need to gently pull them to the back of the machine. This gets them out of the way so that your machine can operate properly.
Once they are out of the way, they should run freely if you tug on them. This means the threads are flowing through your machine evenly and smoothly, which is important if your machine is to make clean and tight stitches.
Step 9 – Test Your Sewing Machine to Make Sure it Was Threaded Properly
At this point, it is important to perform a test, which will allow you to make sure the stitches and thread tension are set properly. You will want to work with a piece of scrap fabric rather than the fabrics you actually plan on working with.
When you are performing a test, hold the thread ends gently between your thumb and index finger, which will prevent them from becoming tangled. It is also important to apply gentle pressure on the foot pedal, as this will allow you to stop before a tangle is formed if the machine was not threaded properly.
Do not worry if something goes wrong. Threading mistakes are common, especially if you are new to sewing or you are using a sewing machine for the first time. If you discover a problem, simply unplug your machine and trace the threads back to the bobbin and spool. See if you can locate the problem so you know what went wrong for when you rethread the machine.
If, on the other hand, the test goes well and your machine is creating proper stitches on your piece of test fabric, congratulations, you have successfully threaded your sewing machine! From here, you can make tension adjustments and select a stitch pattern.
Follow the steps outlined above the next time you need to thread your sewing machine and continue doing so until you do not even have to think about threading your machine!
Additional Tips for Threading a Sewing Machine
While the steps outlined above should be enough to thread your sewing machine, it still can be a fairly challenging process. If you are still struggling, consider some of the following tips to make threading your sewing machine a little bit easier:
- Use Bright Lighting – Threading a sewing machine in a poorly lit room will make the entire task much more difficult. This is especially true when you are performing some of the more intricate tasks, like threading the eye of the sewing machine’s needle. If your sewing room does not receive adequate natural light, or the overhead light is not overly bright, you should invest in a good desk lamp for your sewing work station.
- Trim the Thread Before You Start – Your thread will be much easier to work with if it has a crisp, freshly cut end. You should use a pair of sharp sewing scissors to cut the tip of the thread on a 45-degree angle. Not only will this remove any fraying, it will give you a pointier end to work with, which will make things much easier when it comes to inserting your thread through the eye of the needle.
- Ask for Help if You Need it – You should never feel embarrassed to ask for help if you are struggling. Most people first learn how to sew from lessons. If you are attempting to teach yourself how to use a sewing machine and find that you are stuck, consider enrolling in a few sewing classes at a local community college. Not only are the lessons affordable, they are a great place to meet other people that share your hobby.
- Choose High-Quality Thread – Using cheap thread might seem like an easy way to save money, but it is rarely worth it. In most cases, cheaper thread will snap or fray while your machine is running. Even if it holds while your sewing machine is running, there is always a risk that your stitches will unravel after a short period. Save yourself the frustration and pay a little extra for durable, fray-resistant thread.
Choosing a Sewing Machine with an Automatic Needle Threader
If you find that you are struggling to thread your sewing machine needle, you can always invest in a sewing machine with an automatic needle threader. Where an automatic needle threader was once considered a luxury feature that you would only find in the most expensive sewing machines, they are now fairly common and can even be found on some entry-level models.
If you think an automatic needle threader would help, consider the following sewing machines:
Brother – XM2701 Lightweight Sewing Machine
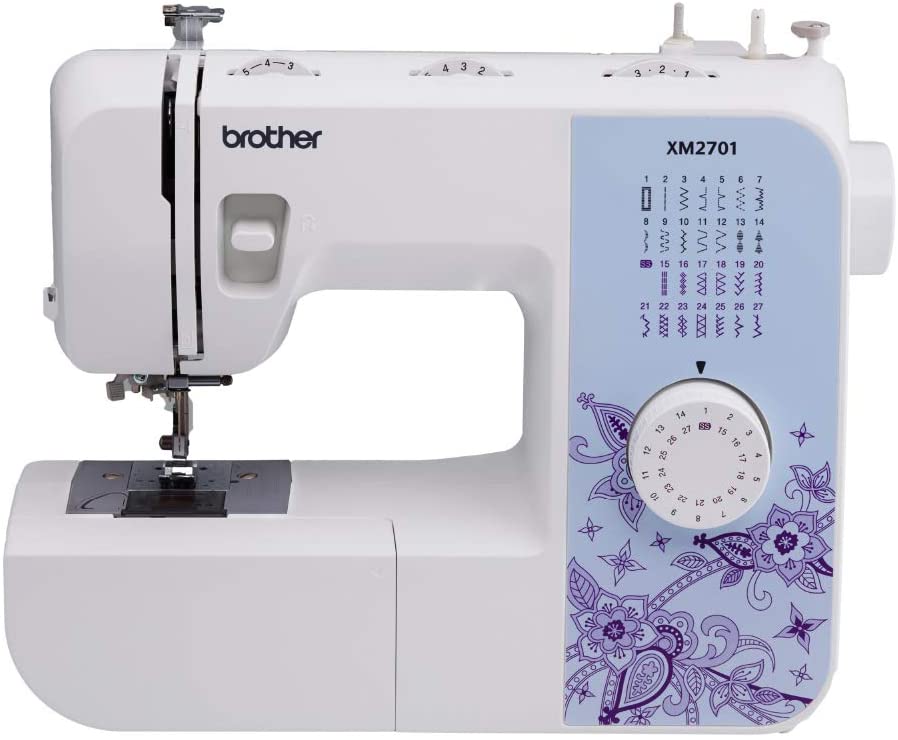
This compact and lightweight sewing machine is the perfect option for beginners, as well as those with more advanced sewing skills that just need an affordable machine for basic sewing tasks. In addition to an automatic needle threader, it features 27 built-in stitches, an auto-size buttonhole stitch setting, and it comes with a variety of useful accessories.
SINGER – Simple 3232 Sewing Machine with Built-in Needle Threader

This handy little sewing machine was designed with beginners in mind, but it has enough advanced features to make it a practical option for those that are looking to complete more complicated sewing tasks.
Like the Brother XM2701, it has a variety of built-in stitches, a buttonhole maker setting, and an automatic needle threader that is incredibly easy to use. Overall, it is a great option for anyone that is looking for a sewing machine that is affordable, lightweight, and really easy to thread.
Final Words
By reading your instruction manual and following the steps outlined above, you should be able to thread your sewing machine easily and without frustration.
Just remember, practice makes perfect, so do not worry if it takes a while the first few times you thread your sewing machine!


")


